Jewelers Bench Tips
 This selection of Jewelers Bench Tips is generated through experiences and challenges my students faced in their training. This page started 2011 and will over time become an info spot for my web guests on issues and perspectives generally unavailable in jewelry books and publications.
MASTERING FIRESCALE
This area of Jewelers Bench Tips and the following instructions are based on Martinus’ research regarding silver discoloration in the polishing phase. Please see “FIRESCALE… KNOW MORE!”
Option 1: Flux protection
To achieve the best polish we should aim to avoid surface oxidation all together, protecting all sterling surfaces with fluxes. This way polishing becomes a beautifully easy final step. Note: Green fluoride-based fluxes are not recommended due to higher work temperatures; oxidation will enter before the fluxes take effect If we don’t succeed completely and encounter oxidation, pickling will cause fine silver layers to appear, which can mechanically be removed. Importantly, sterling silver beneath any fine silver layer is usually unaffected. You can trust that polishing will be just fine!
Option 2: Embracing Matte Fine Silver Surfaces
Let’s take what we have learned and make the best of it! Let’s use oxidation and acid treatments as a design feature to create color enhancements. That can easily be done, it takes a minimum of two, or better three oxidations and picklings to achieve a beautifully frosted, pristine white “bloom” on your sterling silver surface. For best results, Martinus recommends gently brushing your surfaces in-between picklings with a fine, wet, soapy, brass wire brush. Also, take time to lightly brush your piece even after the final pickling.
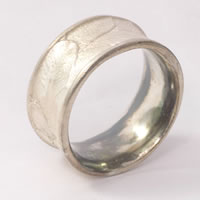
Image 1
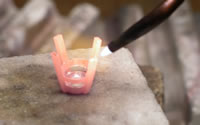
Contrasts of Matte and Polished
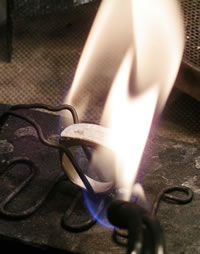
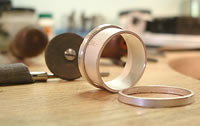
If our jewelry designs involve contrasting matte and polished surfaces; the polishing phase will require special consideration. As expected, once we begin our general polish, some discoloration may occur. This should not concern us anymore – we simply focus on the reflectivity of all surfaces. After cleaning, the next step is to create a light oxidation under a gentle flame, (Image 1), then pickle until all surfaces become white again. A light buffing with rouge finishes the piece to a perfectly reflective, pristine white surface. It also has the advantage of less future tarnishing, (Image 2). (For designs in gold, you can use the same techniques; light oxidation while maintaining a reflective surface as well as careful buffing.) For both metals, heating to a full glow results in dull surfaces causing the necessity for a total general polishing all over again.
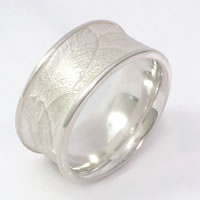
Image 2
Gold – Color Enhancements
Gold responds in the same way although it doesn’t cause any discoloration issues. Fortunately, due to the higher copper content in ‘Peach Gold’ or ‘Rose Gold’, we can achieve more intense, vibrant hues in a pristine matte yellow “bloom” which works best when heated to a full glow. Gold alloys of 14 karat are generally easy to work with, 18 karat alloys will display stronger hues but 10 karat alloys simply don’t have enough gold content, (in some of these alloy compositions, zinc can also cause troubles as a reddish discoloration).
Acids and Methods in Use
In general, earlier methods, (prior to alternative acid products), applied Sulphuric Acid to sterling silver with excellent results. Today ‘Sparex’ works comparably and won’t burn holes in your clothes! Hydrochloric Acid was used historically to create an exceptionally beautiful surface on gold; use extreme CAUTION as it is hazardous. ‘Wilacid’ from Germany works comparably and it is low risk – like ‘Sparex’. (Note: ‘Wilacid’ cannot be used for silver). To conduct your own research on acids and treatments, refer to the goldsmith Oppi Untracht who covers the topic at great length in “Jewelry – Concepts and Technology” pages: 416 – 420 and/or the ‘Theory and Practice of Goldsmithing’ by Brepohl pages: 353 – 354, see: “Bringing up the Fine Silver”.
After decades at the workbench embracing fine silver and fine gold surfaces as design elements, Martinus advises students that clean acids are important for a dependable color enhancement. Used acids from silver projects will make gold turn a pale green. Contaminated acids with nickel from white gold will make silver turn a dull shade of grey.
back to top
SOLDERING
The Jewelers Bench Tips – here’s what works
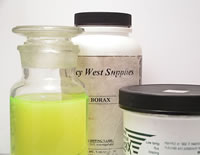
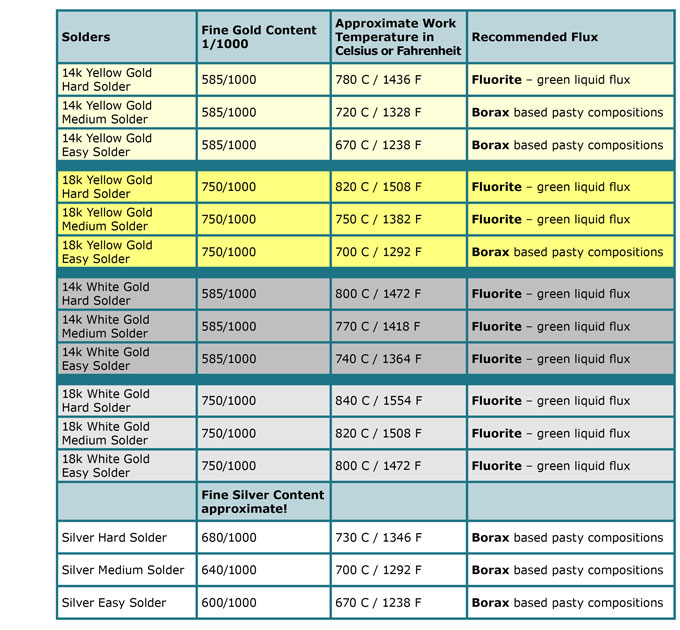
Flux is an oxidation protector used for gold and silver soldering. Without flux the solder will not connect with your piece. It comes in different forms, dry, liquid or as a paste.
Working with silver and low carat gold soldering:
You can buy flux in powder form {i.e. Borax} from the grocery store. The pasty, borax based composition products, from tool suppliers are slightly better.
Working with higher carat gold:
Use Fluoride flux. The powder is orange and turns green when dissolved in – preferably – distilled water. You can find it ready mixed at tool suppliers.
 Working in white gold, with nickel content:
Because white gold needs complete protection, use alcohol based Boric Acid, Borax and little fluoride flux addition in the mix can improve the results. (More info further down)
Solder is a special metal alloy created to melt, before the metal’s melting point is reached. While being heated, it will penetrate and connect the surfaces, without the risk of melting the entire work piece. Mostly Cadmium and sometimes Zink are used to reduce the solder’s melting interval, and those metals will evaporate in the soldering process while liquid.
 Balling up Solder
Withstand the temptation to ball up solder! Your solder has lost half of its capacity to connect before you begin. That means, about half the distance to run and a lesser willingness to merge with your piece. The simple reason is that the tiny portion of cadmium, to reduce the melting point, partly evaporated already while creating the ball. You also need to know, that once it is gone completely, your solder will not run again. That can be seen as an advantage in the construction process if you know how to use right!
 Flux – Solder Relationships
Most people don’t pay enough attention to temperature ranges and how to combine both Solder and Flux right. See the two most common problems as follows.
1. When solder flows before the flux
Imagine your solder is melting before the flux forms a liquid glaze, unable to connect through to the piece, even balling up. You will have unwanted cadmium losses plus oxidation on the solder, while the solder still can’t sink through the pasty cover. This will lead you to overheat the solder, until the glazing is liquid enough to finally let the solder sink through and connect to the metal. Overheating solder causes shorter running distances, porosity; lesser stability and often unevenness of the solder line and unwanted clean ups.
2. When flux gave up before the solder runs
The other variation is that low temperature flux gives up, before your high temperature solders come to run, which will leave your solder and surfaces unprotected, oxidizing. Once the solder liquefies, oxidation which had meanwhile developed in the seam as well will limit or stop your solder from running. The outcome for your work pieces shows similar results like the above, porosity, poor stability, eating into the surface when pushing the heat and lots of unwanted clean ups will make for the major issues.
Boric acid-covers protect the entire piece
Harmless on your skin, boric acid is a white powder that makes for a great protection against surface oxidation. Two common solutions are studio proven. The paste form, mixed with water applied with a brush or dipped. The downside is, it is thick and it distracts the view while the solder also tends to float inside the paste. Second choice, Boric Acid dissolved in Methylhydrate until saturated for finer distribution over the piece. With this method you can also mix in 30% – 50% Borax to help the protection to set in at lower temperatures, which is important for silver and the running distances of your solders (read Martinus on fire scale). This mix works fine for white gold with nickel contents as well. It is absolutely necessary since nickel oxides can’t be removed with regular acids. Apply Fluoride Flux on seams prior to dipping twice into the boric acid solution and burn off the alcohol each time. Then apply the solder with fluoride flux. Please note: Easy solders have a tendency to float on the boric/borax-cover. Push those through with the pick before they have lost their cadmium content!
Make sure to use an unbreakable container and a lid that can shut down an accidentally caught-on flame.
Jewelers Bench Tips on Flux and Solder Combinations
 Solder has a starting point and a temperature span while in use. It can vary according to composition and supplier. Please take my Approximate Work Temperature as a good guess where the melting sets in. If you are in doubt, please contact your Refiner or Supplier. More and more suppliers are changing their composition away from cadmium as a flow temperature reducing component of the solder. These solders are made with Zinc and their flow behaviour and colour is not as advantageous as the cadmium varieties.
Generally you need to remember, Fluxes based on white pasty Borax mixes are used for the lower work temperatures below (730 Celsius or 1350 Fahrenheit) whereas the green Fluorite flux is used for temperatures higher than these numbers up to 820 C or 1510 F. Jewelers Bench Tips offer your free download here!
Soldering – Four Step Refined
Here you find what books don’t teach you. Recently I have discovered that even an apprentice after four years of soldering experience still has some need for guidance. Even though my apprentice is extremely talented there are still a few things that need to be considered.
What is solder?
You may know, soldering in general is the melting of a metal called solder that has a lower melting temperature than the one that it is to be bonded with. Some manufacturers ( refineries ) create the solder out of the same metal that it is supposed to be connected with, adding cadmium or zinc. Those are alloyed in, to lower the solder’s melting temperature while also offering a melting interval of the solder from just running, to running well, to being exhausted in the running distance. Solder heated this far will never run again. This is a good thing! Once understood, the use of hard, to medium, to easy solder becomes of secondary importance!
One Problem, four reasons!
Our apprentice experienced that the solder did not want to melt at all, let alone, melt into the seams. It got stuck on the surface and did not want to move anywhere, while the piece was black in oxides. We are about to learn that 4 different causes have piled up onto one another.
#1 – What kind is your solder?
First. Today refineries try to avoid cadmium as a poisonous material, changing to the use of zinc. You can detect that when working with gold, there this solder leaves a whitish surface behind where it was applied, silver solder of that kind leaves a dark spot. Cadmium solder surfaces do not do that. These zinc solders do not have that flowing capacity and distance that solders with cadmium content have. In our case the cadmium free solder caused one of four problems. It gives up in prolonged heating faster than the cadmium kind you might be used to.
#2 – Prolonged heating & unwanted oxidation!
The second part of the problematic. My apprentice focused on the solder and the seam from one side far too long, so that the opposite side, where the solder was supposed to arrive, had oxidized already. The flux had given up in the duration of the soldering attempt.
Hesitance and fear are in the way here, but it also leads us to another aspect of our work – where is the heat!
#3 – Where’s the heat.
A third aspect of the problem was that my apprentice put more focus on the solder and the seam, rather than thinking of the piece’s temperature as such. It needed to be heated enough before the focus can move towards the solder or the seam.
That means it is crucial to heat up any size of any piece and all its components to a point that oxidization on unfluxed areas sets in, watch that as your temperature confirmation. Afterwards focus the flame on its flux protected areas where your connection is meant to happen. It’s not the solder that sneaks in, its the right heat which seduces the solder, as one of my students replied to my explanations.
The importance of the flame is next!
#4 – The flame’s sweet spot.
Problematic number four is based on the fact that every flame that we use in our workshop has areas where it is oxidizing our piece. But it also has areas where is it deoxidizing our piece. Besides that, it is important for every jeweler to know where these areas are found in the flame. It is also advantageous if you have a big enough flame to gently bathe your piece in the flame for your solder’s temptation. Moving a smaller flame rapidly over your piece instead, causes unnecessary oxidation!
Here is a general idea to help. Flames that have a light yellowish area about in the middle of the length of it will cause that your piece deoxidizes even without flux. Take the torch you are using to find out. While avoiding a sharp hissing sound of your flame, watch the surface of your piece. While coming closer or taking more distance you will find the deoxidizing, sweet spot of the flame. The unprotected surface changes from dark to bright. Bright, that’s it!!! Never forget. Always watch it.
Final Conclusion
As a conclusion, heating your piece while focusing on the solder causes evaporation of the low melting ingredients zinc or cadmium of your solder. That means very simply, if your piece is not hot enough to integrate the solder your solder is exhausted and will never run in a proper way. Finally, if oxidation gets into your solder seam as a result of extended heating, the solder is for sure unable to get into these areas. You have to be swift, but not hasty, observant but not delaying. Find the sweet spot of your flame right where your solder is supposed to be running. That’s it!!! – Solder well and make good jewelry!
I hope, Jewelers Bench Tips could help you to improve -Martinus-
 The Titanium Pick
An investment for life and in quality seams for the rest of your life! Don’t be cheap to use steel. Our fluxes will dissolve steel oxides and give them off into the solder seams. You don’t want them there!!!
back to top